Showing posts with label Painting. Show all posts

Tuesday, January 29, 2013

Chalk Paint Chair....

So as most of you know I had a list of projects I wanted to do before bub arrives and so far I've been on track but my chair below will be waiting for it's wax coat until after I'm home from hospital and in routine with bub now but it's almost done. The bigger project I wanted to do will  have to wait til after bub is home as I'll need to get into a routine with him and it'll take a week to get it done. However I did start something completely new to me, I've never used it before and being that once again we can't get it in Australia (story of my life being in the west) I've had to do some research into how to make my own....Chalk Paint that is.
 
Now I would like to ask you my lovely fellow bloggers if any of you have had the chance to work with Chalk Paint or made your own to use?? I first read about Chalk Paint over at Reloved Rubbish and Amanda had me intrigued as with this paint as you don't need to sand, there's no need to prime the sufarce before application, just start putting the paint to the piece you want to revamp and it'll adhere.....Sounds great right?? Yep sure did to me too until I went to see if we could get it here and of course we can't. Now I really wanted to try this painting style and as I can't buy it I thought the next best thing to do would be to make it, so after some research I found Liz at Naptime decorator who generously shared how to make Chalk Paint and it really is quite simple. It's basically 2 parts paint to 1 part plaster of paris and if the paint is a little stiff then add slowly a few drops of water and mix. If while painting the paint stiffens a bit just mix it around and loosen it up, it'll remix.

Armed with this new knowledge I thought, right I'm off to Bunnings (naturally lol) to get some plaster of paris and get my chair done. And that is what I did....now my mixture was a little too stiff when I started so I had to add more water to get the right consistency. The first coat was looking a little scary but I was sure once it dried and I got the second coat on things would come good.

One of our dining room chairs...ready to be revamped...

The reason I've only done one dining room chair so far is because our setting originally had six chairs but one night when I was mopping the floor at the old house I accidently knocked a chair off the table and it hit the ground so hard that the wood split and broke the leg......so now we have five and being that five is an odd number (and I don't like odd things, ever) I only have four around the table and the spare sits in the kitchen for when we need it. However if all goes well with the first trial chair then I'll be revamping the whole dining suite.....

After popping out a couple of screws I removed the cast iron work that I love...

With the first coat of my home made chalk paint...I used the duck egg blue...

As you can see with the first coat things were looking a little scary from my point of view and once the paint is dry it feels quite rough but then it is chalk paint...I've been assured that once the wax is on it has a lovely finish and a nice feel to it.
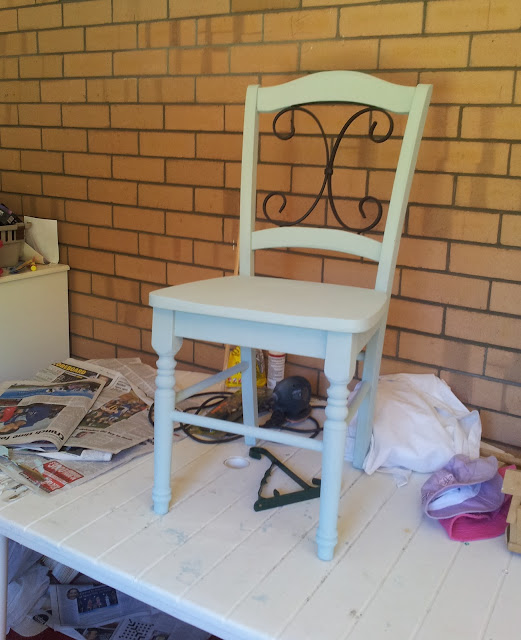
My chair with the iron back in so you can all see how things are going...one more coat of paint and then a waxing and all will be done...however it may be a few weeks before I can finish it..

Considering once again this is a first attempt at something completely new I'm very happy with how it's going so far and I'm loving the colour...it seems the plaster of paris has made the Duck Egg Blue a little lighter once dry but I quite like it as it's a softer blue. Obviously there will be a part 2 to this post once I've finally finished it so keep your eyes open to see how things go once the wax is on....For now I'm off to do a few last minte things before bub makes his arrival so take care for now and Au revoir....xo

Michelle


Monday, January 21, 2013

From Drab And Outdated To Revamped And Useful...

Bonjour mon amis...as I said on Friday I've been working on a small and quick project but despite it being small and an easy project anyone could do I have to say I'm very happy with it and love the colour....Now most of you know I love to white wash everything I revamp (hehe) but this time I wanted to inject a little colour against the white.....For ages I've loved Duck Egg Blue so I went with it at half strength and am so happy with the way it came out, especially considering I'm not really a big blue lover...with the exception of the ocean :)
 
Old and out dated...though I kind of liked this blueish colour and that's what inspired me to go with the Duck Egg Blue.....
 
So all I did was remove the backing cardboard, the picture which was just a print and the glass. I threw the glass out as I had no need for it, I turned the print over and glued it to the backing cardboard and gave it a couple of coats of white paint.

A few coats of white paint and the backing is ready to have pics pinned to it....
 
Next I primed the frame with a couple of coats of white paint then finished it with the Duck Egg Blue, popped the painted backing back into the frame and voila done....Now I have either a new notice board or a mood board, I'm not quite sure what it's going to be used for yet.....I'm even thinking about maybe putting it in bub's room where I can put pics as he's changing.

Finished in Duck Egg Blue....

I love the blue against the white...it won't live here but a good spot to get a good pic...
 
This really was such a quick and easy project and I'm still on track for all the things I want to get done before bub arrives...assuming he doesn't come today, that is because today I'm starting on a slightly bigger project that I'm going to need a few days for.....so hopefully he'll let me get it done.

I'm really happy with how it came out and now to find the right home....it could still go in bubs room yet....

A possible home for my new notice/mood board....
 
So what do you think mon ami's are you a blue colour lover or do you prefer to stick to all white or perhaps you have another colour you love to throw around the house....I'd love to know what your fave accent colours are.
 
Well I'm off for now so take care and I'll be back asap before bub has me in hospital and I can't do anything for a while.....Au revoir ami's....xo
 
Michelle


Wednesday, January 2, 2013

Some More Sewing & A Stencilled Breakfast Tray.....

Bonjour! A couple of weeks ago I mentioned I was trying to get as many projects done as possible before bub comes and so far I'm mostly on track...yey...I've put together another breast feeding cover and matching burping bib and love the farbic I made them in.
 
Love this scribble flower pattern....


Matching Burping bib....these sets will be on etsy soon...
 
I also managed to successfully cut out my very first stencil and I have to admit it wasn't as easy  as I thought it would be but I think it came out well....It's funny that when we look at doing something new, we quite often think 'it'll be easy'...sometimes it is and other times it's a little trickier than expected.....Cutting the stencil itself wasn't too bad but boy did I make a huge mistake in painting it onto the breakfast tray....I have now learnt, yes the hard way, don't leave acrylic paint to dry while a stencil is still attached to your work.....why you ask?? Because acrylic paint dries kind of rubbery and when you lift the stencil, guess what happens.....yep that's right....the stencil peels the paint off when lifted off your work to remove it......Trust me I was not at all happy when this happened...I'm challenged being crafty as it is and to have everything go according to plan and then have this happen just made me even more annoyed and frustrated......
 
However having said that....I got to work on fixing my work by hand as best I could and in the end I ended up with a stencilled breakfast tray that came out pretty well after all for a first try...And I have to thank my wonderful hubby for putting up with me blithering on about how crappy it looked and reassuring me it was fine....and would also like to thank the lovely Kris at thebouselife for all her advice and tips on how to stencil because without her help I wouldn't have got it done.....
 
So now we have gone from a plane boring $10 kmart breakfast tray.....
 
As it was purchased, plain and with a slight varnish on it....
 
Completely stripped back and ready to be revamped French Style....
 
The finished product.....after much anguishing over mistakes...
 
I have to say in the end I'm quite happy with my first ever stencilling project...
 
So although there were no tears but much cursing I resigned myself to the fact that I have never stencilled anything, ever before, it's harder than I thought it would be and it was my first attempt....therefore on the whole I'm happy with it and I think it came out really well....I'm planning another stencilling project soon, before bub gets here so stay tuned and keep watching...take care for now and I'll be back soon....Au revoir...xo
 
Michelle


Monday, December 17, 2012

From Country Wood To Coastal White...

Bonjour and how are we all today? I hope you all had a good weekend and got lots done...we had a relatively quiet weekend with a trip to Bunbury to pick up a car seat for bub on Saturday, the meeting Sunday morning of course and then a trip to the beach after lunch Sunday. All in all it was a good, quietish and relaxing weekend.
 
I have been quiet again on the lil ole blog here for a few days simply because I haven't had a lot to report and I've been attempting to get a project done to share with you all. However every time I try and start this project something comes along to stop me but not today!! Today I finally got started on revamping my mirror I bought years ago.....when I first bought it it was stained and I loved it but then at the time of buying it I was very much into my house being everything country. And though I love the geometry of my mirror I just felt it was time for a revamp to join the French/Beach/Coastal theme I have going on here now and so far all has gone well.
 
Country wood...I loved the shape of this mirror the moment I saw it five years ago..
 
Sanded back to bare bones and what a beautiful grain this wood has....I should have been a carpenter...
 
Drying...amazing how a coat of white paint freshens everything up...
 
Completely revamped with mirror back in place...
 
 
Nice and bright and freshened up...


Well I have to say I'm very happy with how well my mirror came out, it looks much more fresh, bright and crisp.....also if fits the theme with the rest of the house now especially considering it probably won't reside in our bedroom forever....
 
So tomorrow I've got some sewing on the menu as well as some stencil making....I'm really trying to get as many projects done in the next six weeks before bub gets here.....I'll be revamping an old china cabinet while Bec's away on hoilday so keep a watch....I'm off for now as I have a few things before turning in for the night so have a good week where ever you are, I'll be back tomorrow with an update on the baby journey and to show you what I've been making on the sewing machine....take care for now....Au revoir....xo
 
Michelle